about*dallyings

...domestic*dallyings is a blog dedicated to all things a domestic goddess should know - here you will find all my love, interests & inspirations. whether it's the desire to cook a meal that warms your soul, the need to create something lovely, or simply browse for inspiration, let domestic*dallyings be your inspiration. by browsing the *dallyings* going on around my home [whether it be in my kitchen, my crafting, or even my web searching] i hope to inspire the domestic goddess that lives in all of us...

Wednesday, August 31

easy*peach*preserves

....if y'all are anything like me, oftentimes you end up with WAYYY more produce/fruit/food [in general] that you had planned on.

This was just what happened to me. After waiting for longer than I thought necessary for my 5 huge ginormous peaches to be ripe, it came the time for me to finally enjoy them. I had bought more than enough, I naively though, to last the engineer and I for at least the length of the workweek.

Turns out, I opened my front door earlier to find a bag of produce from my gardener friend, along with a bag of one dozen local, farmstand peaches.

"'YES!!" was my first thought, then....

...."what on earth am I going to do with close to TWO DOZEN peaches? Yikes!"


After pulling my hair out in frustration over this sudden abundance careful thought and consideration, I figured I might as well put on my happy face - we're talking LOCAL peaches, after all! What more could a foodie gal like me ask for? I knew that I wanted to make something that would last, so I settled on peach preserves made in my bread machine.

Let me repeat that - preserves.made.in.the.bread.machine.
life does not get simpler.
By all means, you can certainly do this on a stovetop with the same ingredients, but I cannot begin to tell you how easy this is if you have a miracle-worker machine bread machine. Here's the what-you-need and how-to below: 

what you need
-a ridiculous amount of peaches...I used 6 large ones, skin on and everything
-scant 1/3 cup of sugar [I normally don't like to put sugar in my preserves, but the engineer likes it a little sweeter...must be why he chose me!....so I threw a little in]
-1 packet of fruit pectin

how to:
1. Begin by cutting your peaches in half around the seed, and discarding them [the seeds, not the peaches. duh].

heavenly goodness.
2. Next, load all the peaches, sugar, and pectin into your bread machine, being sure to set it for the JAM cycle. I've never tried making bread with just fruit, but I think it's a safe bet it wouldn't turn out.

note: if you're making this on the stovetop, place ingredients into a pot and simmer until the desired consistency....probably a good 20-30 minutes.

3. Once complete, pour into canning jars or tupperware, and enj


Because jams and preserves never last long in my house, I typically don't use the canning method to preserves them for months and months. Untreated jars and tupperwares should last a few weeks with regular use.

Hope the hump day is treating y'all well!

cheers!


Tuesday, August 30

yellow*squash*fritters

whew. talk about a double post!


I simply decided that I just COULDN'T leave you hanging. 


Y'all are being so patient with me as I get used to the whole "blog my life" thing, that I figured I owed it to ya :) So without any further ado, here are my awesometastic yellow*squash*fritters


yellow*squash*fritters
adapted from thisprimallife.com
serves 2-4 [the engineer and I each had 2]


you need:
-3 yellow squash
-1/4 to 1/2 cup flour [ it will really depend on how quick your batter gets thick when you add it; mine was just shy of a half cup]
-1 egg
-1 clove of minced garlic
-1 tbsp. dried parsley
-chili powder and cayenne pepper, to taste
-salt&pepper, to taste
-olive oil spray or extra virgin olive oil, for coating the pan


stuff yous need.
how to:
1.grate the squash into a bowl and toss with salt. Let sit for 10-15 minutes to draw out moisture. THIS IS IMPORTANT, lovelies! You don't want soggy fritters, trust me.
 
grate, grate, grate!
2. After the squash has set for the time, grab small handfuls of it at a time and squeeze out your aggression any  excess moisture. After each handful, place the dried bits onto a kitchen towel [I spread mine out on my cutting board to minimize the mess]. Once all has been squeezed, gather the towel into a ball and give it one last squeeze.

3. In a small bowl, mix together the garlic, egg, flour, salt&pepper, parsley, cayenne, and chili powder.
mix
4. Combine the squash with the egg mixture and mix well.

the beginnings of wonder. for real.
5. Now this is where you can get creative. Because we were having this for a main dish, I made four large fritters. 
 Y
ou can totes make mini ones - like if you're entertaining! 

Or make one BIG one!...whatever floats your boat.

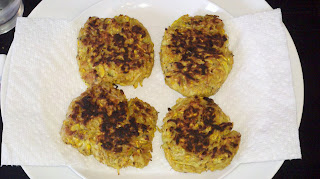
...anyways. In a preheated skillet [coated with spray or oil] place your fritters gently into the pan. Depending on the size, you will need to cook anywhere from 1-3 minutes per side [unless you're going mad and decide to make one large one, and then all I can say is ..... good luck].

nom.
6. Flip and babysit until the color and crispiness is to your liking.


delish.
7. Enjoy! As I mentioned in my last post, I served the beauts up with my asian*cucumber*salad.

...I also want to note that these are great topped with tzaziki, and a little bit of sriacha sauce. NOM times a million. You will love these, I promise!


...Wait!! What's that??


"Alicia, these sound so good! But alas, I don't have any yellow squash - what to do!?!?!"


Fear not lovelies, sub in whatever you have. 
Taters.
Zucchini.
Eggplant.
...get creative :)


cheers!!

asian*cucumber*salad

Hello, lovelies!


I sure do hope that you had a terrific Tuesday :) 


I wanted to share this recipe that we had for dinner with you - as you may recall from last night, I promised you some delish recipes that will help you make full use of an overabundance of fresh, garden produce. I don't know about you, but lately I've been finding myself with more squash/cukes etc. that I know what to do with. So, while trying to think up dinner ideas for last night (yes, I know that I am a day behind, but bear with me...I'm new at all this!!) I thought to myself...


"SELF!! (because this is how I refer to myself as) What if you made a cold cucumber salad?? Those three beauties you have sitting in the veggie basket are just asking to be marinated and tossed with some veggies!"


lightbulb.


So I made excellent use of my time at work google searching ideas and methods, and landed upon this little one. Mixed with a little bit of domestic*goddess*ingenuity, I think that I may have produced a winner.


asian*cucumber*salad
adapted from food.com
serves 4


what you need:
-2 to 3 cucumbers - I had 2 big ones, but 3 mediums/4 small would yield you about the same [you get the -picture]
-generous sprinkle of kosher salt


-1 medium pepper [I used a yellow bell, because that's what looked best at the store yesterday]


for the sauce:
-1 clove of garlic, minced
-3 tbsp. low sodium soy sauce
-1 tsp. red wine vinegar [or to taste]
-1 tsp. sugar
-dashes of chili powder and cayenne pepper, to taste
-salt&pepper, to taste


how to:
1. slice the cucumbers in half lengthwise, then use a spoon to remove the seeds.


while you're at it, might as well slice up that pretty pepper too!
2. Place the cucumber slices into a colander over a bowl or sink, sprinkle with a good amount of salt (1-2 teaspoons) and let drain for 10-15 minutes.

adios, excess water!
3. Make your sauce:
In a bowl large enough to [later] hold the veggies, whisk together the garlic, soy sauce, vinegar, sugar, S&P, 
chili powder, and cayenne. Set aside until you're ready to add the veggies.
 
tasty!
4. Once the cukes have set for 10 minutes, rinse thoroughly with cold water and pat dry.

5. Toss the cukes and yellow bell with the sauce, and let sit [for marinating purposes] for roughly 10 minutes...


...or until you're ready for dinner. YUM. 


I served this showstopper of a salad with my zesty yellow*squash*fritters...recipe to come later kids, the engineer's belated birthday celebration has the remainder of my evening. Look for the fritter recipe later on, I promise it'll be worth it!


cheers!


Monday, August 29

whew!

Hello, everyone!


I am most definitely overdue for a blog post (or two!!) and don't you worry, I'll be back here tomorrow with lots of tasty dishes that I've cooked up over the past few evenings. Between the engineer's birthday this past weekend, visitors, and bbq guests, I had absolutely ZERO spare time.


Be on the lookout for:


....a great way to use an over-abundance of yellow squash.


...too many cukes? I've got you covered!


....a traditional Italian dish that the engineer has requested for his [belated] birthday dinner tomorrow.


Have a good evening lovelies!


cheers!

Friday, August 26

arugula*pea*pesto

Happy Friday, friends!!

I don't know about you, but I sure am glad the weekend's here! Like I mentioned yesterday, it's been super busy around here, and I'll be glad come the end of the workday. The weekend is going to be busy, too....but in a good way. It's the engineer's birthday tomorrow (yay!) so we've got several friends coming into town to celebrate. We're also throwing a party tomorrow, sort of a combination of "happy birthday/we got a new deck put in so let's throw a party!"
pretty snazzy, right?

So to prepare for this epicness, your's truly has lots of cooking to do tomorrow! I've got the menu completely somewhat lined up, and I promise that I'll be posting recipes for all of them. It's looking like several grilled pizzas, homemade dips and bread, cocktails, etc. What can I say - when you're cooking for roughly 15 people, you gotta go all out :)

....and see the fire pit? You can bet that we'll be cookin' up some S'MORES!

Anyways, let's get back to the reason for this post. See the title?

arugula*pea*pesto

I had a total blond moment while posting last night and completely forgot to include the ingredient/prep list for the arugula/pea pesto. It's pretty easy, pretty simple, and you just use what you have on hand! Because it's all blended up into a smooth somewhat thick, delicious spread, I did a lot of the ingredient additions to taste. Become one with your food! Put your spoon in there in between pulses, and see how it tastes! And the mouthfeel is compeltely up to you; I like my pestos a bit on the chunkier side, but if you prefer a smoother texture, by all means, blend that until it's smooth as baby's skin.

...is that a weird analogy for pesto? ugh...moving on...

Let's get to it:

what you need:
-several cups of fresh arugula
(I had a 1/2lb. bag from the farmer's market, and can safely say that I used at least 4-5 handfuls)
-1/2 to 1 cup of peas
(I used frozen)
-scant tbsp. of olive oil, plus additional if needed
-1/4-1/2 cup chicken stock (maybe a little more if you like your pesto a little thinner)
....this is where it gets interesting. I love me some pesto, but the amount of olive oil typically used can slightly significantly up the fat and caloric content of said spread. so, in order to alleviate some of that but still keep the flavor, I sub in chicken stock for the majority of the liquid. you still get that wonderful flavor from the olive oil, but the chicken stock adds a different twist to it. Win win!
-parmesan cheese, to taste
(I'd say a 1/4 cup)
-salt&pepper, to taste
-3 to 4 tbsp. toasted nuts - you can use more or less, depending on your taste
(I had walnuts on hand; to toast them, simply place the desired amount into a dry, small skillet, and toast over medium-low heat. You'll know they're done when you start to smell them.*and be sure to watch them! They'll burn in an instant if you turn away*)
-fresh lemon wedge

how to:
1. Place all ingredients (less the olive oil and stock) into a food processor or stand mixer.
....I have a cheapo stand mixer, so I had to do it in batches. ugh.

2. Begin to pulse away until the ingredients have been chopped up slightly.

3. Slowly stream in the olive oil first (since you're using less of this), then add in the chicken stock. You'll want to watch the pesto, and stop when it reaches the desired consistency.

4. Squeeze in the juice of half a lemon, and enjoy!

Side note:
This pesto is a wonderful, multi-purpose kitchen sauce. Not only did I use it on yesterday's sandwich, but I've also tossed with with pasta (and some of the starchy pasta water) for a quick and easy dinner. It coats the pasta wonderfully, and has such a wonderful, peppery flavor. And if you are a pesto traditionalist, you can omit the stock and use all EVOO. It's up to you!

Be on the lookout for more tasty posts later on :)
Cheers, and happy weekend! 

Thursday, August 25

greek*grilled*cheese

hello, loves!
....yes, yes, i know...where have i been this week?! before you start jumping to conclusions and assuming that i [already] forgot about you, fear not! this week has been a bit extremely hectic. between meetings, puppy surgery, and re-enacting engagement pictures [yes, i'll post them and explain my crazy] i just didn't have the time on hand that i usually do. 

let's not talk about ordering chinese the other night.
...now don't get me wrong, i love it just as much as the next gal, but let's be serious, i'd much rather cook a tasty dinner than order out. but sometimes ya gotta do what ya gotta do.

anyways. let's get back to the meaning behind tonight's post. have any of y'all ever had grilled cheese? dumb stupid question - let's rephrase that. have any of y'all ever had GREEK grilled cheese? it sounds a little strange, i know but....i had the most amazing sandwich based on this concept earlier this year at a dive bar in north carolina, and let me tell you, i was hooked. as you will soon find out, i am a sucker for anything veggie, and the local tomato and cukes in the sandwich just scream bold, fresh, DELISH. pair it with the arugula/pea pesto i whipped up awhile back with excess produce [and promptly proceeded to chuck it in the freezer for later usage], creamy provolone and sharp shavings of parmesean cheese, it's ideal. the perfect dinner for a rainy night to cozy up with your engineer [more on him later:) ] and help your puppy recover. can't beat that, let's be real. ready to jump in?

*greek grilled cheese
based on a sandwich i had @ the federal, in north carolina
-serves: 1

ingredients:
-one thick cut slice of fresh bread
(i used homemade peasant bread, but any hearty white/wheat bread will do)...i'll talk more about my homemade in a later post, promise!
-1/4 of a smaller cucumber 
(i get fresh veggies from my friend with a garden, & i'm pretty sure these are just standard, hothouse cukes, nothing fancy)
-1 medium vine tomato
-arugula/pea pesto, recipe below
-1.1/2 slices of GOOD provolone cheese
-2 to 3 tbsp. of GOOD parmesan 
-salt&pepper&olive.oil.spray
(these are essential to escalating any dinner from good to great, am i right??)

here's how you assemble:
1. preheat stovetop to medium-medium high. depending on your stovetop and how high it gets, you might have to adjust this slightly. the important thing here is making sure that your grillpan/large skillet/whatever you have on hand is toasty and waiting for you, and not the other way around.
....unless you like being toasty? i'm not judging, promise.

2. assemble your ingredients. as i mentioned, i used one thick slice = a 1/2 sandwich, which turned out to be the right size for this gal. you'll want to have everything laid out and ready, so that you can easily go from building your sandwich to the pan. you'll want to spray the outer sides of your sandwich with the spray now, to avoid an unhappy cook when you try to do it with spray in one hand, sandwich that was [once in hand] and is now a sad pile on the floor. wahh. we won't go there.

the sandwich on the right is the engineer's - he went simple tonight.
3. start stacking that little piece of heaven on your cutting board; on the base of your sandwich, spread a generous amount of arugula/pea pesto, provolone [1 full slice] half the tomato, half the cucumber, half the parmesan, and a sprinkling of salt&pepper. repeat your layering until you've exhausted yourself and your ingredients [i went through two layers].

yay stacking ingredients!!
4. transfer this gem into your preheated skillet, and plop a heavy-bottomed skillet onto the top. 
boom! toasted.
....now, i know you're thinking, "what the hell is alicia thinking?!?" fear not, friends - this is an excellent way to press your sandwiches. and by doing this, you ensure that you effectively distribute squish all your sandwich goodness together in the middle, making for awesome mouth feel and crispy toasty bread. yum.
MOVING ON.

5. keep an eye on the underside of your sandwich, making sure to cook it to your desired crispness toasty-ness. for me, i like a pretty, brown crust....because brunettes have more fun, right? i'd give it 5-6 minutes on that first side.

6. flip when you so desire.....
see you on the flip side.

7. ...and let it continue on the other side. be sure to keep in mind that the second side [much like a pancake] will typically go faster than the first, so don't stray too far.

8. once you've deemed your sandwich is cooked to perfection, slide it onto a plate and enjoy!


showstopper.
....i highly suggest serving this with chips of your choice, and a cold brew. YUM.

GO HOKIES!
no, i wasn't paid to say that. GO TECH GO!


.....& because i was so amazed, i had to take a picture. this will never happen again.

sleepiest.muffin.ever.
now, let's recap this deliciousness. a sandwich is a vessel for pretty much anything easy and awesome, and this one proves that. if i had any on hand, i would have subbed the parmesan for feta and tossed the tomatoes and cukes with a little greek seasoning. maybe a little arugula for a punch of flavor and some pretty green color. 
...i like my food to look pretty, don't you?
the true beauty of this sandwich is that you can really dress it [no pun intended] to suit your tastes, and what you have on hand. let me know in the comments section how you made it your own!

cheers!


Monday, August 22

welcome to domestic*dallyings!

hi everyone! & welcome to my blog, domestic*dallyings. i've been toying around with the idea of creating a blog for some time now, and figured....alicia, JUST GO FOR IT! it's my hope that this blog will serve not only as self-inspiration, but as inspiration for all you out there as well! before i dive into this headfirst, let me talk a little more about what i hope to achieve writing this:

1. food inspiration
*food is something that i've always had a huge passions for. it's what makes me happy when i'm sad, turns my day around and just makes me feel all warm and fuzzy inside :) i'm definitely the type of girl that reads cookbooks for fun, surfs the web for recipes to test, and [of course] LOVES to eat. i find that the best memories are often those formed around a kitchen table, spent with those you love. i will be sharing with you my culinary creations, both those that i've thrown together on a whim, those that have been done by-the-book, and those that have been tweaked and/or modified in some way, shape, or form.
[& for those of you out there that like to know where said recipes come from, i'll be sure to include all the specifics]
most of my cooking i do in my tiny little kitchen, puppy underfoot and fiance lounging by the counter. it's a tight space in our little bungalow of a house, but i coulnd't imagine anything more perfect. knowing that i'm cooking for someone who loves me [and my food] is one of the most heartwarming feels for this gal.

2. home inspiration
*this is something that i am drawn to as well. i graduated college with a bachelor's degree in design, so my house and how it looks is something that i take seriously. VERY seriously. although i am the first to admit that....well...sometimes my projects are slow going [for example; walk into my living room and you will see 4 paint colors on the wall - we've got the final color, just haven't had time to do it! i blame the humidity]. i have an eye for all things pretty, and adore mixing colors, textures, patterns, style and everything in between. i am a firm believer that your personal style is a reflection of how you live your life and your personality, so i am doing my best to make sure that our house honestly reflects who we are.
....so what can you expect to see about this? design ideas, for one. i am always looking for DIY projects that will enhance spaces, and clever ways to make small spaces seem roomier. i'll also share some personal ideas, before-&-afters of said projects, and products that i think are helpful. sounds like a hodge-podge of wonderful, if you ask me :)

3. novel & reading suggestions
*now, i don't know about y'all, but i am a reader. always have been, and always will be. while i don't have the time to read like i used to, i still try to find the time to squeeze in a couple books on a semi-regular basis. i want to share what i read, and what i think. and hopefully this will provide some inspiration to add to your shelves.
...you can find me on goodreads, too!

4. wedding ideas
*now, this is not a wedding blog, nor do i intend to [ever] turn it into one. but, seeing as i am newly engaged, i might just not be able to help myself at times :) hopefully, for those of you out there in the same boat as yours truly, i can provide a good idea, a lovely product....or even just a smile.
....i won't get too carried away, i promise!

every now and then, don't be surprised if i throw something out there that is completely random. the idea behind this blog is to bring our your inner domestic goddess, and sometimes it could be something you wouldn't expect. i'm excited to share this journey with y'all, as i continue to hone my skills and turn into the best *domestic goddess* that i can be. cheers!